|
The iView Tool:
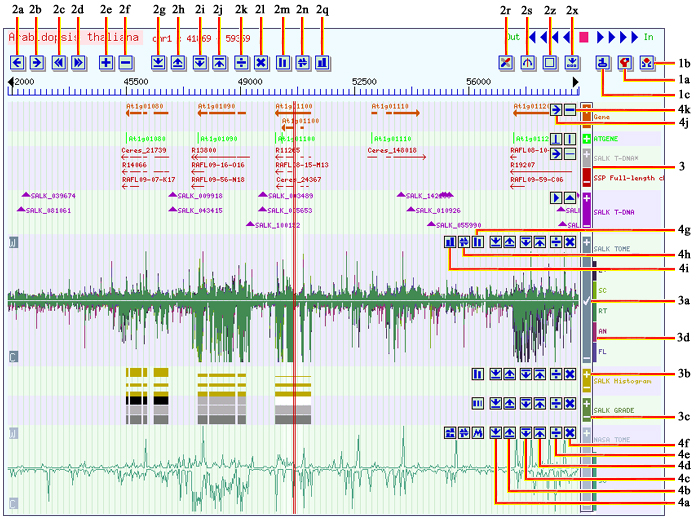
Figure 1: The Graphic Interface The iView Tool is a new integrated tool provided by the gebd to allow user dynamicly manipulate or control the graphic display for better view by just clicking the iView buttons on the image. It will allow users to span or shrink the track height, to change shape types and their sizes, and to shrift the genome focus left or right in small steps. It also allows user to increase or to decrease the minimum cut off value and the maximum saturation value, and thus to pull down or push up the background signals as well as the peak signals for the quantitative data sets. It uses the HTTP-COOKIE to save user's settings, therefore, the user's Internet browser should be set to receive the trusted SIGnAL Website cookies. Below are detail description and explanation of the buttons marked on the Figure 1. 1. The iView Launch Panel 1a: the iView Control Button to launches or to closes the iView buttons display, thus allow to turn on or turn off the iView operations. It consists of a cycle of three options. a) Click once to launch the iView tool buttons on the menu panel (2 in Figure 1). b) Click again to open the iView track operation buttons on each track. c) Click the third time to close the iView tool buttons. 1b: the iSect Tool Button: To launch Preference, Search, Genome Locating, iFetch, mGene Search, iSect Sequences by location, iSect Sequences by Data List, iPrimer Design by List, iPrimer Design by Sequence and Gene Expression Atlas. 1c: the Edit Preference Button. To show or to hide datasets, to define UTR, Promoter values, ImageWidth, ZoomFactor, to set Background Colors and/or to choose Display. 2. The iView Tool Panel 2a and 2b: the Arrow Left and the Right Navigator Buttons to allow the image shift 1 pixel or the genome position shift bases of interval to the left or the right. 2c and 2d: the Double Arrow Left and Right Navigator Buttons to allow the image shift 5 pixels or 5 times of genome bases of interval to the left or the right. 2e and 2f: the Track Span or Shrink Buttons to increase or to decrease the height of the selected track. 2g and 2h: the Background Signal Control Buttons to allow users higher or lower the background cut off value and thus to increase or decrease the background signals. 2i and 2j: the Saturation Signal Control Buttons to set higher or lower saturated signal value and thus to peak up or down the signals. 2k and Fig 1-2l: the Signal Amplification Buttons to increment or decrease the signal display without changes of the background and the saturation cutoff values. 2m: the Shape Control Buttons to change shape type to display as arrow, line, triangle or marker for the entry data, or to display as intensity grade, signal bar, or signal curve for the quantitative data. 2n: the Shape Style Button to set the shape size or style. 2q: the Display Control Button to control signal display as a single track or a multiple sub-track in a supper track. 2r: the iAtlas Button to launch and display gene expression atlas. 2s: the iStats Button to display basic statistic information for the selected or focus dataset. 2z: the iView Default Setting Button to remove all changes in user's iView operations and restore the default settings. 2x: the Menu Panel Control Button to set the iView button panel displayed on the bottom or on the title area of the image. 3. The Dataset Panel 3a: the Data Select Bar to allow user select a dataset and thus select a track as the FOCUS track to carry out the iView operations on it. The dataset bar will be CHECK marked if selected. The user will launch the iView Track Tool by clicking on '1a' again, the buttons described below will appear on the image. These buttons have the same operations as the main menu buttons have, but only effective to its own track. 3b and 3c: the Track Span or Shrink Buttons to span or shrink this track only. 3d: the Foreground Display Area to select a sub set of data displaying on the foreground of the track. The iView Track Panel 4a and 4b: the Background Signal Control Buttons to set background cutoff of this track only. 4c and 4d: the Saturation Signal Control Buttons to set maximum cutoff value of this track. 4e and 4f: the Signal Amplification Buttons to change signal height. 4g, 4h, 4i, 4j and 4k: the Display Style Buttons to control shape type, shape size, display styles. They are the same as 2m, 2n and 2q. |